Wednesday, December 12, 2007

Quick altered notepads

Wow what a week.. Today is already Wednesday the 12th.. That means there's only 12 more days till Christmas.. and sooooooo much to do..

I have a friend "Pat".. sometimes she has more faith in me than I have in myself. On Saturday I officially began the journey that will alter the course of the rest of my life. My goal is to loose 134 lbs. An average sized model or a couple small children... if you want to look at it that way... Today Pat & I had a bet.. I guessed that by this afternoon I would have lost 5 lbs.. Pat guessed 8. I told her that if she was right I'd make her a gift tonight.. Well, she has some insightfulness that I don't have because I lost 8.6 lbs. So Pat... I'm a woman of my word... This is for you.
I made 2 covered note pads (the 2nd is for another co-worker who was almost out of paper today... So what the hey... She'll be surprised)... For these I used...

Card Stock.. Soft Sky, Cosmo Cricket Dutchgirl DS Paper (these were the letters as well)
Accessories.. MS white and aqua twill ribbon, rain drops, stickles, bob & ron rub-on's, hemp twine, versa mark & clear embossing powder.

Wow... 8.6 lbs in 5 days.. GO FIGURE :)
Happy Stamping ...

Tuesday, December 11, 2007

"Bee" Merry

Happy Tuesday... I think my lack of food lately (long story we'll save that for another time) has gone to my head. I decided to work on a few projects for Christmas gifts but this little card has burrowed a hole in my head. I just had to finish it..

This card uses real red & whisper white card stock. Sorry but I'm not sure who made the green & red ds paper.. The bee trio is stamped in black stazon and colored in certainly celery & real red markers. I added a little glitter for that 'wow' effect. The dots & swirl chip board are from maya road. I colored then with red paint and then embossed then with clear embossing powder. Finally I added the "Be Merry" sentiment at the bottom.

This is about as non-traditional as I'm going to get. Check back later this week for a few holiday projects.

Happy Stamping :)

Friday, December 7, 2007

Non-traditional card... take 2

I knew you'd be back.. And I think you'll be pleasantly happy that you did.... Are you ready ???? I absolutely love how this card came out. The coloring is so soft and of course it uses not only 1 of my favorite colors.. "chocolate chip" but is also uses 1 of my favorite holiday images.. a "snow man"..

This card was made using a 51/2" x 11" piece of chocolate card stock so that when it was folded it would be 5 1/2" square.. To make the snowman, I stamped the image in timber stazon on very vanilla card stock and colored with my copic markers and blender pen for the soft subtle coloring. Once my snowman was stamped and colored, I stamped my snowflakes using versa mark and then embossed them with iridescent ice embossing powder. I then distressed around the edges using Tim Holtz distressing walnut ink. How did I make the ice you ask? Crystal Effects. Is this not the cutest.

The sentiment is a Making Memories holiday rub on. Here's the remainder of the recipe..

Card stock.. chocolate chip, soft sky, very vanilla and basic gray figgy pudding
Accessories.. Making Memories rub-on, crystal effects, dimensional pop ups, SUP chocolate wide satin ribbon

Have a fabulous weekend everyone and, Happy Stamping :)
NOTE... whoops sorry.. This snowman is from SweetMissDaisy's.... Whippersnapper Designs... I love them and she's having a new release on January 1st.. :)

Thursday, December 6, 2007

A non-traditional christmas challenge

Happy Thursday. I can't believe that after being up since 3 AM (well actually awake since 3, up since 4 to work at 5:30)... I'm actually here at my computer instead of dead tired in bed... I hope your all having a wonderful week...

A couple days ago Lindsay's (Jacksonbelle Embellishments) member companies thread on SCS was getting a big quite. So to spice things up a bit she posted a challenge for us to make "non-traditional" holiday cards... UGH that was a hard one for me but so far I've come up with 2 (you'll need to stop back tomorrow for card #2)... Here's my first attempt.. I made a tag card... The envelope was made with Basic Grey paper. Folded and taped and with my large circle punch punched out the notch..

For the inside I started with a tag of whisper white and sage shadow. The tag I cut free-hand. I then stamped the sentiment and the snowflakes in versa mark and embossed them with clear embossing powder. I then took my sage shadow ink pad and rubbed it all over the tag to give it the sage color. Then I broke out my brand new bottle of glimmer mist and spritzed till I had just enough of the blue. Before it could dry I rubbed the entire tag with a dry washcloth to expose the snowflakes and words. To dry the card I used my embossing gun. I then applied the crystal beads to the center of each snowflake for a little bling. The sage and white Martha Stewart Twill ribbon is tied though a large eyelet. And viola' I was done...

I'll be using this as a gift tag instead of a card.. But it's nice and big.. :)

Please stop over to Linsday's thread on SCS to check out all of the other fun cards... And don't forget... tomorrow I'll be posting my 2nd card..

Happy Stamping :)

Monday, December 3, 2007

Santa's elves have been very busy...

Happy Monday.. I hope you all weathered this first nasty taste of old man winter. It's been heading across the states all weekend and when it finally hit the east coast over night we got lots and lots of ice. Good news is (if you can call it that) I've had a stomach bug, so after being up all night decided I better not go in today. So I was on the sofa most of the day.

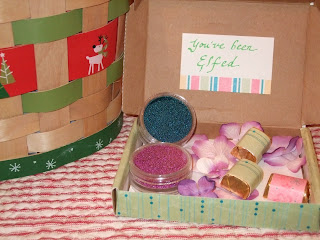
Today though was a great mail day.. My bind-it-all along with the accessoriess I ordered on Friday from stampingcottage.com arrived today (excellent price... Free shipping on orders over $50 and super fast shipping.. I highly recommend them). Teresa finally received her elf package I mailed on Wednesday (it's only going about 30-45 minutes away and it took 5 days priority mail to get there. That's our USPS for ya).. And I received not 1 but 2 elf packages today..

My first package was from a secret elf.. No name, just a return address. This package contained blue and magenta micro beads. I can't wait to make some pens with these. A few covered Hershey nuggets and some prima flowers..


My 2nd package was from my Secret Elf. I hosted a Secret Elf (similar to secret santa) on SCS and Lindsay (mustamper) was my partner. She sent me .. An altered can filled with lots of bling, bling (large eyelets, my name, brads, and adhesive gems, stars, drops & hearts), gift tags, 2 altered bottles, 2 scrap books, an altered cd case, and a treat can filled with Hershey kisses. It's awesome. I can't wait to start using everything.

Thank you Lindsay..
Happy Stamping :)

Sunday, December 2, 2007

Ornaments... check

  • Tree ... check
  • Lights ... check
  • Ornaments.. check
  • Out side lights.. check
  • Inside decorations.. check
PHEW... done. I'm finally done decorating and boy does it seem like a weight has been lifted off of my shoulders. This week's shopping I did mostly on-line so that too has put a rather large dent in my to do list.. YIPEE... Does anyone else feel like we women have a lot to do to make the holiday's complete? WHY do we do all this... Because we love our families..

When I saw this post on Allie Edward's blog I just knew I had to make these adorable ornaments. They were sooo easy... (sorry no stamping at all) Well once I got the hang of getting the rub-on's to adhere to the clear round ball... It was a cinch.. I made 12 which gave me enough to make as a centerpiece for our dining room table and as a large lighted piece for the entertainment center. The hurricane holder on the entrainment center is actually from At Home America. To make this arrangement I started with an extra strand of clear lights, added some 'artificial' sugared cranberries ( My intention was for these to go inside the ornaments.. whoops.. too big for the little hole.. so I impravised) and added some extra snow. All of the ornaments in this piece (the directions for the ornaments themselves are below) say "Merry Christmas". I layered the cranberries, lights and ornaments until the vase was full. The remaining lights I strung around lighting everything up. In the dark.. this is beautiful.

Next came the dining room centerpiece. To make the ornaments I started with clear ornaments I picked up at Mike's. I then rubbed on Bo-Bunny Holiday sayings (Merry Christmas & Happy Holiday's). Then I stuffed the fluffy white snow inside. This was the most time consuming. To do this I made a small funnel and pushed the snow down in with my finger or a pair of needle nose pliers. My finger seemed to work the best. I then put the silver top back on and added some red ribbon for the holder. The basket I picked up today at Mike's for 50% off.. As a matter of fact, so were the ornaments. This made a very cute and inexpensive centerpiece for the dining room.

And finally here's our slim tree. I love it. It's covered in clear and red lights. You can see where I added the adorable angel and snowman primitive garland I picked up at TJ Maxx. It's mostly covered in primitive snowmen and santa's with a few reindeer and balls thrown in for good luck.

So tell us... what is your favorite holiday decorations?

Happy Stamping :)